
Highlight to Edit Basics
This feature is ideal for dialogue-driven content, such as interviews, press conferences, documentaries, football matches, talk shows, and factual entertainment. It’s designed to help producers, editors, marketers, and even clients create fast, clean rough cuts from long-form media.
What is Highlight to Edit?
Highlight to Edit allows you to:
- Work directly from a high-accuracy transcript (we support more than 100 languages and dialects, see Supported Languages & Dialects)
- Select dialogue segments to instantly clip video
- Build rough cuts, highlights, or scene bins without needing an editor
- Organize clips into collections for later use
It’s a fast, accessible way to begin editing from speech.
Where do I find this feature?
You’ll find it in the left-hand navigation bar, just click the pen icon labeled “Highlight to Edit”.
How do I use Highlight to Edit?
- Click “Add Video” and choose a long-form piece of content.
- A transcript will automatically appear.
- Highlight any part of the transcript and click on “Clip”, the corresponding video segment is clipped instantly.
- Select one or more clips and add them to a new or existing collection (e.g., “Rough Cuts”), or use them later in exports or in Adobe Premiere.
Anyone can do this, not just editors. Perfect for collaboration across teams.
What other tools are available in Highlight to Edit?
- Chapters, automatically segments your video into 1–5 minute scenes. Great for selecting full scenes or segments at once; you can clip chapters directly.
- Download and Edit Transcript/Captions, fix minor errors (e.g., name misspellings or misheard words). Updates are reflected in exported SRT files (used for Adobe, captions, social sharing, etc.).
- Adjust Text Size, easily enlarge or shrink the transcript font for better readability while editing.
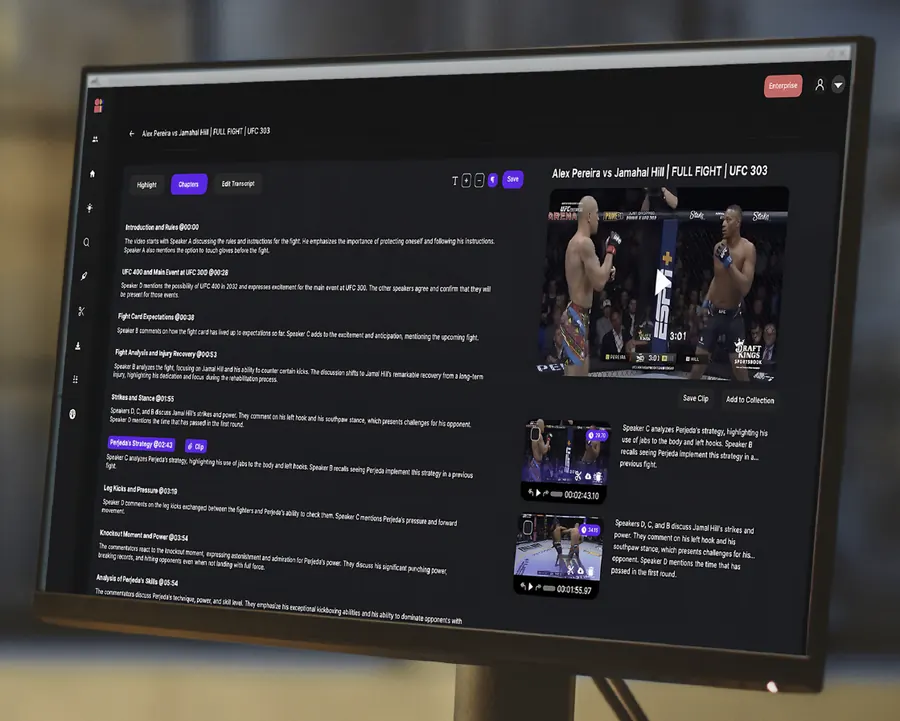
Speaker diarization (labeling who is speaking) is also available as an add-on, contact us if your team needs it.
Every clip or collection you build in Highlight to Edit can be sent straight to Clip Studio for a multi-clip edit, reframing, subtitles and branding, or exported to Adobe Premiere / DaVinci Resolve.
Why use Highlight to Edit?
- Speeds up the first pass edit or assembly phase
- Useful for building bins before handing off to post-production
- Makes it easy to involve non-editors (e.g., clients or marketers)
- Enables faster exports to tools like Adobe Premiere
Got questions or want help rolling this into your workflow? Reach out, we’re here to support your team.
Related articles
Still stuck? Contact support and our team will reply within one business day.